I have been talking python with different kind of programmers – from beginners to experienced programmers – and there is this little issue that, surprisingly, does not have a straightforward answer : what do you need to install to start programming in python ?
This post is dedicated to this little issue and I will try to explain what – in my opinion – is the easiest path from nothing… to… a decent python programming environment.
 Photo by Amr Taha™ on Unsplash.
Our journey will have several stages – and you will have to do some installation homework in order to travel from one stage to another.
At the first stage, you will have to make sure that you are working on the right Operating System and with the right terminal – meaning, compatible with the instructions of this post. !!! Spoiler Alert !!! We will go for a linux OS since it is very popular among programmers and easy to set up – don’t shoot.
At the second stage, you should have installed python 3 on your computer – we will see that, once installed, you technically have a working python programming environment. We will show off two programming modes at this stage : an interactive mode – where you can type commands and see the result in an interactive prompt – a script mode – where you can run full python scripts using the python interpreter from the terminal.
At the third stage, we will enrich our programming environment with high-level python prompts – like ipython and jupyter – and advanced Integrated Development Environments (IDEs) – like vscode. High-level prompts give more context to programmers and are clearly a most-have if you want to improve your interactive programming experience. IDEs, as you might expect, improve the script programming experience with embedded tools for : script execution, coding style, code highlighting, testing, etc.
Now, let’s begin…
1. The OS : where everything starts
 Photo by Gabriel Heinzer on Unsplash
I will assume that you are working on a Linux machine. The first reason I am confident with this assumption is that Linux is a very popular OS for developers (beginners and experienced ones) and Microsoft (which is the most popular OS among normal human being) provides a descent linux subsystem which is an Ubuntu distribution by default. I am thus pretty sure that if the reader (this is you) is a windows user (which is highly possible), he/she will be able to set up a Linux machine, even on his/her windows computer, with little effort – the interested reader could check this article to understand how to set it up.
The second reason I am confident is that, if you are a Mac user (which is highly possible), most of the setup and commands I will show in this post will work on your OS with very little or no change at all. Anyway, for the sake of straightforwardness, I will assume a linux OS – I will focus on MacOs in another post.
2. The Python interpreter : the mandatory install
 Photo by Alex Chumak on Unsplash
Python is actually an interpreter, which means that, unlike a compiler, a python code is parsed and executed dynamically by a special program which is : the Python Interpreter.
If you have a linux OS setup, it is highly possible that you already have a python shipped with your system. But you need to install the right version and make sure to be able to track it down – as you might expect, the interpreter parsing and executing behaviour depends on its version. So how do you install the right python interpreter ? Since you are working on a full linux system (as we have assumed above), you can do the following steps :
Check if a
python3.X.Xis already installed. You can type the following command on your terminal :1
$ python --version
If the result of this command looks like
python X.Y.ZwhereX<3or if the command fails, you should probably installpython 3.X.X. It is highly recommended since most of the python modules and tools provided by the community will not be maintained for older versions. So how do you installpython 3?You need to install
python 3, and the exact how depends on your linux distribution. For Ubuntu distributions (WSL runs Ubuntu by default), the following instructions should be sufficient (forpython 3.8, but you can pick any3.Xversion you want).1 2
$ sudo apt-get update $ sudo apt-get install python3.8
Anyway, I encourage 💪 you to read this post and get the right instructions for your linux distribution. Come back here when you are done with the installation.
Now, you should have the right version installed and technically, you are ready to start programming in Python – you are ready to experience two different programming modes : the interactive mode and the script mode.
Interactive Mode
In the interactive mode, you will be able to launch the default prompt, start typing python commands and see the results interactively by hiting the ⏎ key.
To experience it now, open your linux terminal and do the following steps :
Launch the python prompt
1
  $ python
The above command opens the default prompt which allows you type any valid python command. For example, type the following :
1
2
3
  >>> func = lambda x : x+1 # hit the enter key to create this lambda function
  >>> print(func(6)) # hit the enter key and you should see the result below
  6
Add verbosity with the following :
1
2
  >>> print("the result of func(5) is: ", func(5))
  the result of func(5) is:  6
The animation below looks almost like what you should get if you don’t mistype.
 Fig. Running python commands interactively using the default python prompt
Script Mode
As you might have guessed, in the script mode, your commands should be saved in a text file – that will be your python script. To execute it, just open your terminal and hit : python <yourpythonscriptpath>.
For example, let’s copy the previous section’s commands in a file and try them in a script mode :
Open an empty text file called
test.pywith your favorite editor and type in the following (make sure to save the file in your current workspace 😋) :1 2 3 4
#!/usr/bin/python3 func = lambda x: x+1 print("the result of func(5) is: ", func(5))
Save your file, and type the command below in a linux terminal
1
2
  $ python test.py
  the result of func(5) is:  6
or
1
2
3
  $ chmod +x test.py
  $ ./test.py
  the result of func(5) is:  6
This is it for the script mode!! All you need to do, basically, is to save your commands in a text file, and then, run it in a terminal with the appropriate python interpreter. In the next section will see how you can enrich your programming experience with advanced prompts and code editors 👌.
3. Enriching your programming environment
Advanced prompts
You can enrich your environment with advanced prompts. I am not going to review all the available prompts in this post, but there are two of them that I would like to show off.
IPython
ipython is an advanced prompt that you can install on your computer as a python package. All you have to do is the following in a linux terminal :
1
$ pip install ipython --user
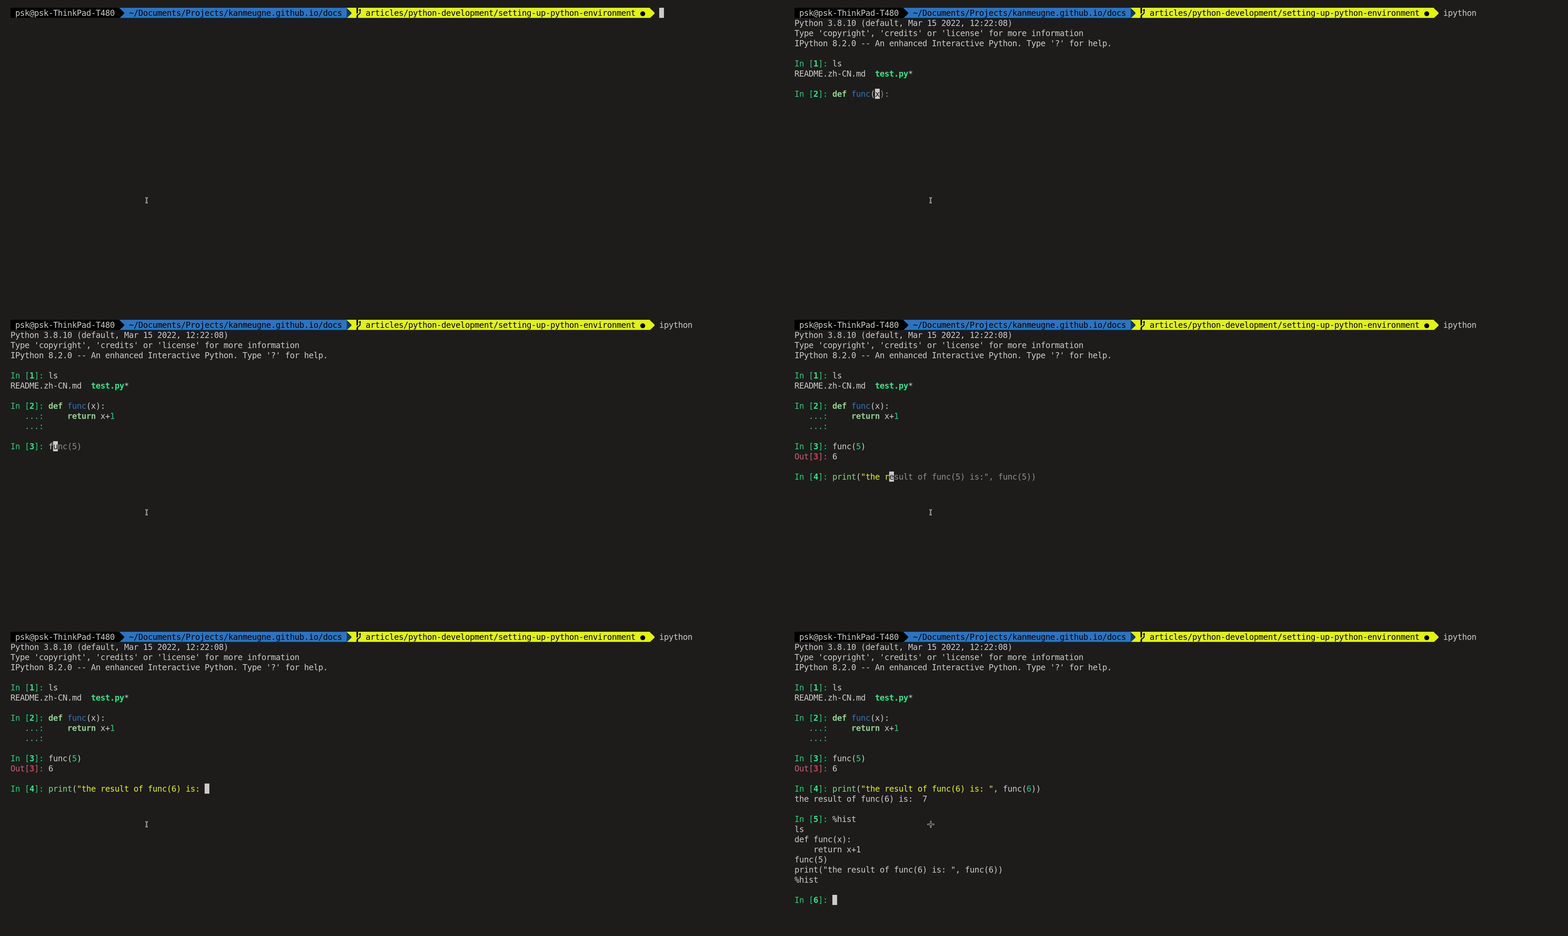
Compared to the default python prompt, ipython is a more colorful prompt and full of helpers that allow for example to :
- navigate in the filesystem without exiting the prompt
- highlight your code (cf. animation)
- auto-complete commands
- see the available attributes and methods of an object
- display the commands history (cf. animation below)
- display the execution time of a command
- etc.
 Fig. IPython in action
Jupyter
ipython is used as the core for even more advanced prompts like the famous web-based prompt : Jupyter Notebook. The Jupyter Notebook is the original web application for creating and sharing computational documents. It offers a simple, streamlined, document-centric experience.
As for ipython, jupyter notebook is installable as a python package :
1
$ pip install jupyter
If the above 👆 command does not work, please go the official installation website to get the most updated procedure. Once installed, run a notebook just by typing the following command on your terminal :
1
jupyter notebook
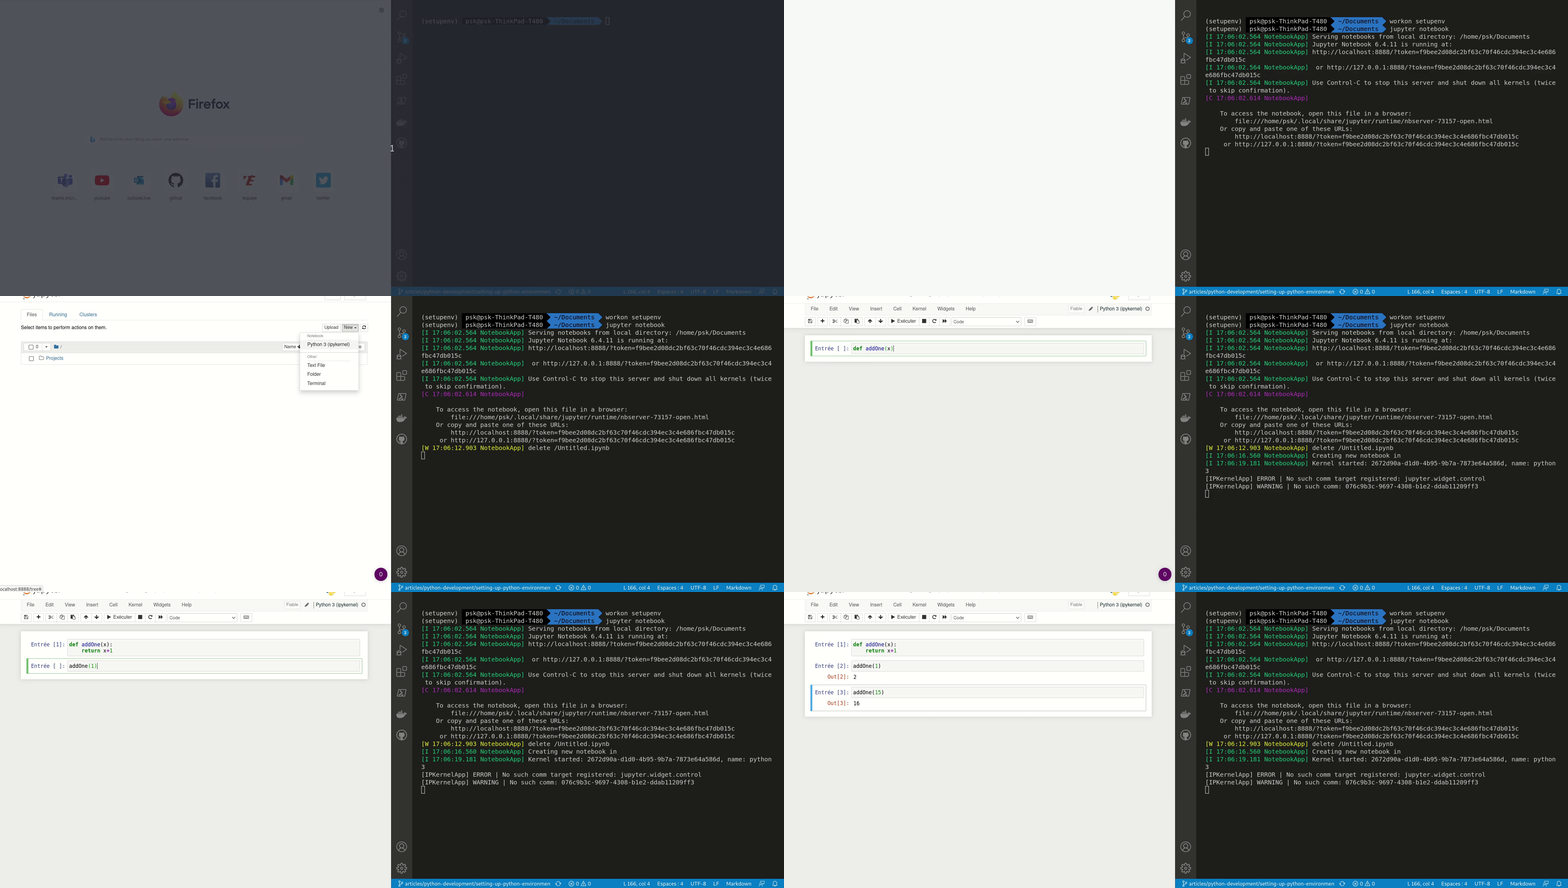
Check the animation below 👇 to see jupyter in action
 Fig. Jupyter notebook in action
Integrated Development Environments (IDEs)
Python code editors are designed for developers who want their best development tools perfectly integrated. There are editors for every type of programmers – the best ones being those you better flow with. Here is a non-exhaustive list of features one could be expecting for, while looking for the perfect IDE :
- a step-by-step debugger
- code navigation tool
- syntax highlighting
- auto completion/importation
- diff tools to see how the code changes between files
- unit/integration test tools integration
- etc.
Below, a list of IDEs I have already seen in action (⚠ my pick is completely innocent 😁) :
- Visual Studio Code (or
vscode) is a lightweight but powerful source code editor which runs on your desktop and is available for Windows, macOS and Linux. It comes with built-in support for JavaScript, TypeScript and Node.js and has a rich ecosystem of extensions for other languages (such as C++, C#, Java, Python, PHP, Go) and runtimes (such as .NET and Unity) - Sublime Text is a shareware cross-platform source code editor. It natively supports many programming languages and markup languages. Users can expand its functionality with plugins, typically community-built and maintained under free-software licenses. To facilitate plugins, Sublime Text features a Python API.
- PyCharm is an integrated development environment used in computer programming, specifically for the Python programming language. It is developed by the Czech company JetBrains (formerly known as IntelliJ). It provides code analysis, a graphical debugger, an integrated unit tester, integration with version control systems, and supports web development with Django as well as data science with Anaconda.
If you want an extensive review, please check this well-documented article on python IDEs.
